Hotfix for problems with outlook email attachments in plain text messages
Tag: outlook
Video on how to create a new profile and setup Office 365 Exchange email account with Outlook 2013 or 2016 profile
1. Create an Outlook profile
This is NOT required if adding a second account – skip to point 2
- Exit Outlook.
- In Control Panel, click or double-click Mail.Where is Mail in Control Panel?
Mail appears in different Control Panel locations depending on the version of the Microsoft Windows operating system, Control Panel view selected, and whether a 32- or 64-bit operating system or version of Microsoft Outlook is installed.
The easiest way to locate Mail is to open Control Panel in Windows, and then in the Search box at the top of window, type Mail. In Control Panel for Windows XP, type Mail in the Address box.
Note: The Mail icon appears after Outlook starts for the first time.
The title bar of the Mail Setup dialog box contains the name of the current profile. To select a different existing profile, click Show Profiles, select the profile name, and then click Properties.
- Click Show Profiles.
- Click Add.
- Type a name for the profile, and then click OK.
2. Add an email account in Outlook for Windows
What do you want to do?
- (2a)Set up my first email account
- (2b)Set up an additional email account
2(a)Set up my first email account
To add an email account to Outlook 2013 or Outlook 2016 for Windows for the first time, the Auto Account Setup starts automatically when you first run the app.
- Start Outlook for the first time.
- From the Welcome screen, click Next.
- To add an email account, click Yes, and then click Next.
- Enter your name, email address, and password, and then click Next.Note: If your computer is connected to a domain for an organization that uses Microsoft Exchange Server, your email information is automatically inserted and the password box doesn’t appear because your Exchange account uses the same password as the one you use to log on to your computer.
- Click Finish.
2(b)Set up an additional email account
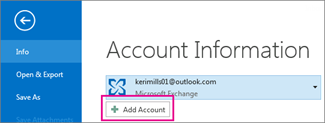
- Click the File tab, and in the right pane, click Add Account.
- In the Add Account box, with Email Account selected, enter your name, email address, password, retype your password, and click Next.Tip: Outlook will complete the set-up for your account.
- Do one of the following:
- Click Finish to close the Add Account box.
- Click Add another account, and follow steps 1 – 3 of this procedure.
Note: Sometimes Outlook 2013 can’t automatically set up a new account and might ask you to try again using an unencrypted connection to the mail server. If that doesn’t work, you can still add the account manually. Contact your email administrator or provider or for help with any settings you’re unsure of.
Problem with stripped or winmail.dat email attachments from Outlook to Apple or webmail via exchange or office 365 – Transport Neutral Encapsulation Format (TNEF) format
We were banging our head against the wall with the winmail.dat problem we have with an office 365 email account.
The solution is to hack the Office 365 server with regards to the Transport Neutral Encapsulation Format (TNEF) format.
INTRODUCTION.
This article describes how Microsoft Office 365 admins can change the message format so that messages that are sent from Office 365 users to external recipients don’t contain the Winmail.dat attachment.
By default, email messages that are sent from Exchange Online in Office 365 use the Transport Neutral Encapsulation Format (TNEF) format. Messaging systems that aren’t based on Microsoft Exchange may be unable to interpret messages that use this rich text format. If the recipient’s messaging system can’t process this format, a file attachment that’s called Winmail.dat is added to the message.
Office 365 admins can use Windows PowerShell to change the message format to prevent the Winmail.dat attachment from being sent to external recipients.
PROCEDURE
You will need to paste in the following commands:
$Session = New-PSSession -ConfigurationName Microsoft.Exchange -ConnectionUri https://outlook.office365.com/powershell/ -Credential $LiveCred -Authentication Basic –AllowRedirection

Import-PSSession $Session

Set-RemoteDomain Default -TNEFEnabled $false
The first line asks for your Office 365 (admin account, please!) username and password and connects you to the service.
Line 2 imports the commands you are going to need.
Line 3 prevents TNEF messages being sent outside of your domain.
Setting it to anywhere outside of your domain is a slightly broad brush-stroke, but it does reduce the overhead of having to keep going back and fix it for each domain you discover that cannot cope. But if you really wanted to only disable TNEF for specific domains, you can:
New-RemoteDomain -Name Awkward -DomainName awkward.comSet-RemoteDomain Awkward -TNEFEnabled $false
In the first line you define your awkward domain, in the second you prevent TNEF messages going to it.
Is there a bigger hammer?
Yes, but while it’s a big hammer it’s also nice and sharply targeted…
Set-MailContact <ExternalEmailAddress or GUID> -UseMapiRichTextFormat Never
…will set mail sent to ExternalEmailAddress to always be sent plain text – no formatting at all.
Like stepping back in time.
Some might say a happier time, when people cared about the amount of bandwidth they used, didn’t send huge attachments and didn’t expect everyone to be using Outlook.
Some might say that, not me of course! I’m just thinking it…
(Updated 2014 to change -ConnectionUri from https://ps.outlook.com/powershell/ to https://outlook.office365.com/powershell/)
——————————————————————————————————————————————-
Source with thanks : https://www.deargeek.co.uk/2013/11/how-to-stop-office-365-sending-those-pesky-winmail-dat-attachments
Other sources :https://support.microsoft.com/en-au/kb/2487954
Downgrading Outlook and backwards compatibility
There can be various reasons which will require you to downgrade to a previous version of Outlook such as the current trial/beta version expiring or compatibility issues with some needed add-ins or business software. This guide provides solutions to various problems you may encounter when trying to downgrade Outlook or when you need to remain compatible with previous versions of Outlook.
We found a really good article explaining this at https://www.howto-outlook.com
For full details, click here
Regards
Mark
How to manually connect Outlook to Office 365 Hosted Exchange
Hooking Outlook to Office 365 or Hosted Exchange is a little different to a local server.
In this article we will explain step by step, how to manually connect Microsoft Outlook to Office 365.
Part 1
Before we begin we need to gather a bit of information.
3. Under Microsoft Office Outlook Connectivity Tests click on Outlook Autodiscover.
4. Fill in the information: Email address and Microsoft Account are your Office 365 Username.
5. Password, is your Office 365 password.
6. Check “I understand the terms and conditions…” and continue.
7. When the test is done hit Expand All.
8. On your keyboard press Ctrl+F and type “Server” within the Find tool. Copy this information within “<Server>” and “</Server>” as you will need it later.
Note: It is highly recommended that you change your Office 365 password after using the above website.
Note: If you are doing this for multiple Users, please be reminded that their mailbox may not be within the same Server as your other Users. It is recommended that you use this tool each time you wish to find your Users Server.
Part 2
Now on your computer.
1. Next click on Start.
2. Click on Control Panel.
3. Navigate over to Mail.
4. Select Show Profiles.
5. And click New.
6. Enter a new Profile Name.
7. Within Add Account : Select Manual Setup of Addition Server Types.
8. Select Microsoft Exchange Server Or Compatible Service.
9. Within “Server:” Paste your Server Name from Part 1. Step 8.
10. Within “UserName:” type your Office 365 Account Username (User@mydomain.com).
11. Click More Settings.
12. Under the Security Tab, uncheck “Encrypt Data between Microsoft Outlook and Microsoft Exchange“.
13. From the “Logon Network Security” drop down box select Anonymous Authentication.
14. Click on the Connections Tab.
15. Check Connect to Microsoft Exchange Using HTTP.
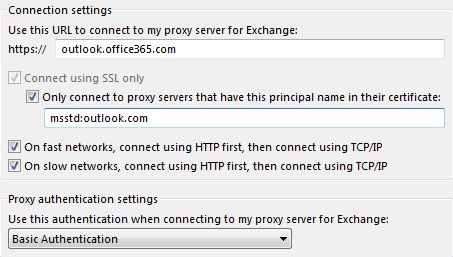
16. Click on Exchange Proxy Settings….
17. On the right of “Https://” type outlook.office365.com
18. Check “Only connect to proxy servers that have this principal name in their certificate:” and type msstd:outlook.com
19. Check “On Fast Networks, connect using HTTP first, then connect using TCP/IP”
20. Under Proxy Authentication click the drop down box and select Basic Authentication.
21. Hit Okay twice and continue with your setup.


